How to Replace Laptop Internal Speakers & Fix Distortion
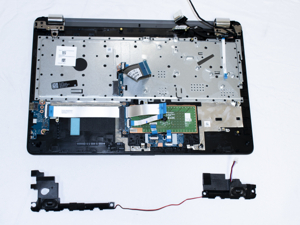
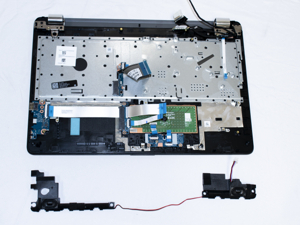
Image 1: Internal laptop speakers being replaced during repair.
Quick Summary
Laptop speaker problems fall into two categories: software issues like outdated drivers and wrong audio settings, and hardware issues like blown speakers, loose connections, or damaged speaker cones. Always try software fixes first — they solve most distortion and crackling problems without opening the laptop.
If software fixes do not work, the speakers are likely physically damaged and need replacement. This guide walks through both software troubleshooting and the complete hardware replacement process.
Common Symptoms of Speaker Problems
Before fixing, identify the exact symptom. Different problems point to different causes.
- Crackling or popping sounds: Usually a driver issue, loose connection, or dust on the speaker cone.
- Distorted or muffled audio: Blown speaker cone, damaged voice coil, or wrong audio enhancement settings.
- No sound at all: Could be muted settings, disabled audio device, disconnected cable, or completely dead speakers.
- One speaker works, the other does not: Broken wire, loose connector, or one blown speaker.
- Low volume even at max: Software volume limiter, damaged speaker cone, or clogged speaker grille.
- Buzzing sound: Electrical interference, loose ground, or damaged speaker membrane.
- Sound works through headphones but not speakers: Faulty speaker switch, loose internal cable, or blown speakers.
Software Fix 1: Check Volume and Audio Output Settings
The simplest fixes are often overlooked. Before assuming hardware failure, check basic Windows audio settings.
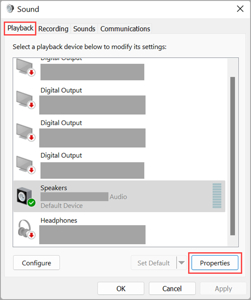
Image 2: Windows sound settings showing output device properties.
- Click the speaker icon in the taskbar.
- Make sure volume is set to at least 50% and not muted.
- Right-click the speaker icon and select Sound settings.
- Under Output device, make sure Speakers is selected (not headphones or external monitor).
- Click the speaker device and check the volume slider is not too low.
If headphones or a Bluetooth device is connected, Windows may route audio to them instead of the internal speakers. Disconnect all external audio devices and test again.
Software Fix 2: Run the Windows Audio Troubleshooter
Windows has a built-in audio troubleshooter that can automatically detect and fix common sound problems.
- Open Settings (Windows + I).
- Go to System > Troubleshoot > Other troubleshooters.
- Find Recording Audio and Playing Audio.
- Click Run next to Playing Audio.
- Follow the on-screen instructions.
- Apply any fixes the troubleshooter suggests.
- Restart the laptop and test sound.
Software Fix 3: Update or Reinstall Audio Drivers
Outdated, corrupted, or incompatible audio drivers are the most common cause of speaker distortion and crackling. Updating or reinstalling the driver often fixes the problem.
- Right-click the Start button and select Device Manager.
- Expand Sound, video and game controllers.
- Right-click your audio device (e.g., Realtek High Definition Audio).
- Select Update driver > Search automatically for drivers.
- If no update is found, right-click and select Uninstall device.
- Restart the laptop — Windows will reinstall the driver automatically.
For the latest drivers, visit your laptop manufacturer’s website and download the audio driver for your specific model.
→ Sound, video and game controllers
→ Right-click audio device
→ Update driver or Uninstall
→ Restart laptop
Software Fix 4: Disable Audio Enhancements
Windows audio enhancements like bass boost, virtual surround, and loudness equalization can cause distortion and crackling, especially on laptop speakers that are not designed for them.
- Right-click the speaker icon in the taskbar.
- Select Sound settings.
- Click your speaker device under Output.
- Scroll down to Audio enhancements.
- Set it to Off or Device default.
- Restart the laptop and test sound.
Software Fix 5: Change Audio Sample Rate
Sometimes the wrong sample rate causes distortion. The default format may not be compatible with your speakers.
- Right-click the speaker icon and select Sound settings.
- Click your speaker device under Output.
- Find Format or Sample rate.
- Try different values: 16-bit, 44100 Hz (CD Quality) is the safest.
- Test sound after each change.
Software Fix 6: Test with Headphones or External Speakers
Plug in headphones or external speakers. If the sound is clear through them but distorted on internal speakers, the problem is definitely hardware — the internal speakers need to be replaced.
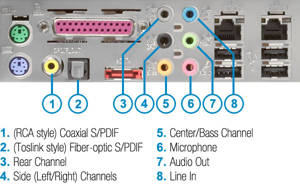
Image 3: Audio jack and speaker connector wiring diagram for laptop output.
If the sound is distorted through headphones too, the problem is on the motherboard audio IC or the audio driver — not the speakers themselves.
Hardware Fix 1: Check the Internal Speaker Cable Connection
Sometimes the speaker cable simply came loose from the motherboard connector. This is especially common after a laptop has been dropped or opened for other repairs.
- Shut down the laptop and unplug the charger.
- Remove the battery if removable.
- Remove the bottom cover screws with a Phillips screwdriver.
- Pry off the bottom cover with a plastic tool.
- Locate the speaker wires — they run from the speakers to the motherboard.
- Check if the speaker cable connector is fully inserted into the motherboard.
- If loose, push it in firmly until it clicks.
- Check for any damaged or pinched wires.
- Reassemble and test.
Most laptop speakers connect to the motherboard via a small white plug. The plug has two thin wires (left and right channel). If the plug is loose or one wire is broken, one or both speakers will not work.
Hardware Fix 2: Clean the Speaker Grilles
Dust, dirt, and debris can accumulate in the speaker grille holes, muffling the sound and causing distortion. Cleaning the grilles is a simple fix that does not require opening the laptop.
- Shut down the laptop.
- Use a soft toothbrush to gently brush the speaker grille openings.
- Use compressed air in short bursts to blow out dust.
- Wipe the grille area with a slightly damp microfiber cloth.
- Let it dry completely before turning on the laptop.
Hardware Fix 3: Replace the Internal Speakers
If software fixes and cable checks do not solve the problem, the speakers themselves are blown or damaged and need replacement. This is a moderately difficult DIY repair.
Step 1: Find Replacement Speakers
- Find your laptop model number on the bottom sticker.
- Search online for “laptop model + replacement speakers”.
- Buy from the manufacturer, eBay, AliExpress, or a trusted parts seller.
- Match the connector type, wire length, and speaker dimensions exactly.
- Replacement speakers typically cost $8 to $25.
Important: Laptop speakers are not universal. Each laptop model uses a specific speaker shape, size, and connector. Always verify the exact replacement part for your model before buying.
Step 2: Open the Laptop
- Shut down the laptop and unplug the charger.
- Remove the battery if removable.
- Ground yourself with an anti-static wrist strap.
- Remove all screws from the bottom cover.
- Note screw lengths — some are shorter than others.
- Pry off the bottom cover with a plastic tool.
Step 3: Disconnect the Old Speakers
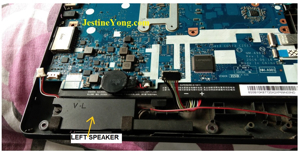
Image 4: Laptop audio circuit and speaker components during distortion repair.
- Locate the speakers inside the laptop base.
- Find where the speaker cable connects to the motherboard.
- Gently pull the connector upward — do not pull the wires.
- If the speakers are screwed in, remove the mounting screws.
- If the speakers are held by adhesive tape, carefully peel them off.
- Note how the wires are routed inside the case.
- Remove the old speaker assembly.
Step 4: Install the New Speakers
- Place the new speakers in the same position.
- Route the wires exactly as the old ones were routed.
- Press the speaker cable connector firmly onto the motherboard header.
- Secure with screws if applicable, or use double-sided tape for adhesive-type speakers.
- Make sure the wires are not pinched between the cover and the case.
- Reinstall the bottom cover and screws.
Step 5: Test the New Speakers
- Plug in the charger and turn on the laptop.
- Play a YouTube video or music file.
- Check both left and right speakers are producing sound.
- Listen for any crackling or distortion.
- Adjust volume up and down to test at different levels.
- Play audio with heavy bass to test for rattling.
Remove bottom cover
Disconnect old speaker cable
Remove old speakers (screws or adhesive)
Place new speakers in position
Connect cable to motherboard
Route wires properly
Reassemble and test
What Causes Laptop Speakers to Blow?
Understanding the cause helps prevent future damage. Laptop speakers are small and delicate — they cannot handle high volume or bass frequencies the way external speakers can.
- Volume at maximum for long periods: The speaker cone tears or the voice coil burns out.
- Liquid damage: Water reaches the speaker membrane, warping or shorting it.
- Dropped laptop: Impact can crack the speaker cone or dislodge the magnet.
- Dust accumulation: Dust on the cone restricts movement and distorts sound.
- Manufacturing defect: Low-quality speakers fail prematurely, especially in budget laptops.
- Audio IC failure: The motherboard audio chip sends distorted signals to the speakers.
- Age: Speaker cones dry out and become brittle after 3 to 5 years of use.
How to Prevent Speaker Damage
- Keep volume below 80% for daily use.
- Use external speakers or headphones for loud music or movies.
- Keep liquids away from the laptop.
- Clean speaker grilles every few months.
- Avoid using audio enhancements that boost bass beyond speaker capacity.
- Do not drop the laptop — use a protective case when traveling.
Quick Diagnosis Checklist
- No sound at all? — Check volume, output device, driver
- Crackling sound? — Update driver, disable enhancements
- Distorted sound? — Check sample rate, test with headphones
- Sound through headphones but not speakers? — Hardware issue, replace speakers
- One speaker dead? — Check cable connection or replace that speaker
- Sound works after reinstalling driver? — It was a software issue
- Still distorted after all software fixes? — Replace the speakers
When to Seek Professional Help
- You are not comfortable opening the laptop.
- The speaker connector on the motherboard is damaged.
- The audio IC on the motherboard is faulty (requires micro-soldering).
- The laptop is still under warranty.
- You cannot find the correct replacement speakers for your model.
Professional speaker replacement costs $40 to $80 including parts and labor. If the audio IC on the motherboard is damaged, repair costs can be $100 to $200.
Useful Links
- Asdullah.com
- Microsoft Support: Fix Sound or Audio Problems
- iFixit: Laptop Internal Speaker Replacement Guide
- Driver Easy: Fix Windows 11 No Sound
- JestineYong: Laptop Distorted Sound Repair
FAQ
Why do my laptop speakers sound crackly?
Crackling is usually caused by outdated audio drivers, audio enhancements turned on, or a loose speaker cable. Start by updating the audio driver in Device Manager and disabling audio enhancements in Sound settings.
Can I replace laptop speakers myself?
Yes, if you are comfortable opening the laptop. Find the exact replacement speakers using your laptop model number, then follow the removal and installation steps in this guide. The repair takes 20 to 40 minutes.
How much do replacement laptop speakers cost?
Replacement speakers cost $8 to $25 online. Professional replacement at a repair shop costs $40 to $80 including labor.
How do I know if my speakers are blown or it is a driver issue?
Plug in headphones. If the sound is clear through headphones but distorted on the speakers, the speakers are blown. If the sound is distorted through both, it is a driver or audio IC issue.
Can blown laptop speakers be repaired?
No, blown speakers cannot be repaired — they must be replaced. The speaker cone or voice coil is physically damaged and cannot be fixed by cleaning or software changes.
Why does only one laptop speaker work?
Either the cable to that speaker is loose or broken, or that specific speaker is blown. Open the laptop and check the cable connection first. If the connection is fine, replace the speakers.
Conclusion
Laptop speaker problems are usually software-related and can be fixed by updating drivers, disabling audio enhancements, and running the Windows audio troubleshooter. Always try these software fixes before opening the laptop.
If the sound is clear through headphones but distorted on internal speakers, the speakers are physically damaged and need replacement. Finding the correct replacement part for your laptop model is the most important step — speakers are not universal. With a screwdriver, plastic pry tool, and 30 minutes, you can replace the speakers yourself and restore clean, clear audio to your laptop.
