
How to Replace a Broken Laptop Screen at Home

Image 1: A cracked and broken laptop screen that needs replacement.
Quick Summary
Replacing a broken laptop screen at home is possible with the right tools and patience. You need to find the correct replacement panel, remove the bezel, disconnect the old screen, connect the new one, and reassemble the laptop.
Most laptop screen replacements take 30 to 60 minutes. The key is to work slowly, keep track of screws, and avoid forcing any plastic clips.
What You Need Before Starting
Before opening your laptop, gather all the tools and the correct replacement screen. Having everything ready makes the job much easier.
- Replacement LCD/LED panel matching your laptop model
- Small Phillips screwdriver (usually PH0 or PH1)
- Plastic pry tool or guitar pick for the bezel
- Magnetic tray or small containers for screws
- Anti-static wrist strap (optional but recommended)
- Microfiber cloth to clean the new screen
Step 1: Find the Correct Replacement Screen
Every laptop uses a specific screen panel. You cannot use any screen — it must match the size, resolution, connector type, and pin layout of your original panel.
- Check your laptop model number on the bottom sticker.
- Search for your laptop model + “screen replacement” online.
- Alternatively, remove the old screen first and read the model number on its back label.
- Order the exact same panel model number from a trusted seller.
Common screen sizes are 15.6 inch, 14 inch, and 13.3 inch. Make sure the resolution (HD, Full HD, 4K) and connector type (30-pin or 40-pin) also match.
Step 2: Power Off and Disconnect
Never work on a laptop that is powered on or connected to a charger.
- Shut down the laptop completely.
- Unplug the charger from the laptop.
- Remove the battery if it is removable. If the battery is internal, proceed carefully.
- Press and hold the power button for 10 seconds to drain any remaining charge.
Step 3: Remove the Bezel Screws
The screen bezel is the plastic frame around the screen. Most laptops have small rubber covers hiding screws along the bezel edges.
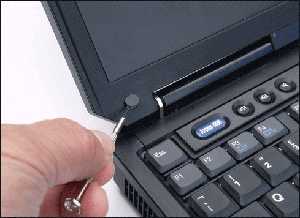
Image 2: Removing screws hidden under rubber covers on the screen bezel.
- Look for small rubber bumpers on the bezel edges.
- Carefully peel them off with a fingernail or plastic tool.
- Remove all screws under the rubber covers.
- Place the screws in a small tray and keep them organized.
Some modern laptops do not have bezel screws. In that case, the bezel is clipped and you need to pry it off directly.
Step 4: Pry Off the Bezel
Once the screws are removed, the bezel needs to be unclipped from the back cover.
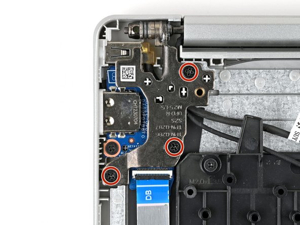
Image 3: Using a plastic pry tool to detach the bezel from the back cover.
- Start at a corner of the bezel.
- Insert a plastic pry tool between the bezel and the back cover.
- Gently push the tool along the edge to unclip the plastic tabs.
- Work your way around all four sides.
- Lift the bezel off carefully and set it aside.
Do not use metal tools for this step — they can scratch the screen or break the plastic clips.
Step 5: Remove the Old Screen
With the bezel removed, you can see the screen panel held by screws on the left and right sides.
- Remove the screws on both sides of the screen panel.
- Carefully lean the screen forward and lay it flat on the keyboard.
- You will see a video cable connector on the back of the panel.
- Peel off any tape holding the cable in place.
- Gently disconnect the video cable by pulling the connector straight out.
Pull the connector straight out — never pull the wires at an angle, or you may damage the cable.
Step 6: Install the New Screen
Now connect the new replacement panel and mount it into the lid.
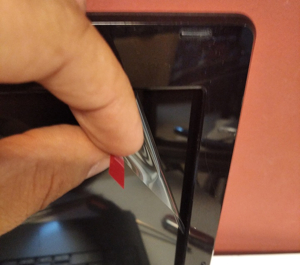
Image 4: Connecting and installing the new replacement LCD panel.
- Take the new screen out of its packaging carefully.
- Hold it by the edges — do not touch the display surface.
- Connect the video cable to the new panel. Make sure it clicks in fully.
- Apply a strip of tape over the connector to hold it secure.
- Place the screen into the lid frame.
- Screw in the side screws on the left and right.
Before reassembling everything, it is a good idea to test the screen.
Step 7: Test Before Reassembly
Before putting the bezel back, test the new screen to make sure it works.
Check display
Look for lines or dead pixels
Power off
- Reconnect the battery if you removed it.
- Plug in the charger.
- Power on the laptop.
- Check if the screen displays correctly with no lines, flickering, or dead pixels.
- If the screen works fine, power off and continue to reassembly.
- If the screen is blank, check the cable connection again.
Step 8: Reassemble the Laptop
Once the screen is confirmed working, put everything back together.
- Snap the bezel back on, starting from one corner.
- Press firmly along all edges until all clips snap in.
- Put the screws back in their original positions.
- Stick the rubber covers back over the screws.
- Clean the screen with a microfiber cloth.
Important Safety Tips
- Always power off before opening the laptop.
- Use plastic tools, not metal, to avoid scratches.
- Keep screws organized — they are small and easy to lose.
- Do not force anything — if something is stuck, check for hidden screws or clips.
- Touch the new screen only by edges to avoid pressure marks.
- Static electricity can damage the panel. Use an anti-static strap if possible.
Common Mistakes to Avoid
- Buying the wrong panel: Always match the exact model number.
- Forcing the bezel: Plastic clips break easily — go slowly.
- Pulling the cable sideways: Always pull connectors straight out.
- Forgetting to test: Always test the screen before full reassembly.
- Losing screws: Use a magnetic tray or labeled containers.
When to Seek Professional Help
If your laptop has a touchscreen, a 2-in-1 convertible design, or a very thin bezel with adhesive instead of screws, the repair is more complex. In these cases, it may be better to take the laptop to a professional repair shop to avoid damaging the display or other components.
Useful Links
- Asdullah.com
- iFixit Repair Guides
- HP Laptop Screen Repair Guide
- Lifewire: Fix Broken Laptop Screen
- PCWorld: Replace a Broken Laptop Screen
FAQ
Can I replace a laptop screen myself?
Yes, most standard laptop screens can be replaced at home with a screwdriver and plastic pry tool.
How much does a replacement screen cost?
Most replacement panels cost between $40 and $100 depending on the size and resolution.
How long does it take?
A first-time repair usually takes 30 to 60 minutes.
Do I need to buy the exact same screen model?
Yes. The replacement panel must match the original in size, resolution, connector type, and pin layout.
Is it safe to touch the back of the screen panel?
Touch only the metal frame edges. Avoid touching the circuit board or the display surface directly.
Conclusion
Replacing a broken laptop screen at home is a doable DIY project if you have the right replacement panel and basic tools. The most important step is finding the correct screen model number and ordering the exact match.
Work slowly, keep track of screws, use plastic tools, and always test the new screen before reassembling the bezel. If your laptop has a touchscreen or adhesive bezel, consider getting professional help instead.
